I didn't know that there was so much video ads on viki and gooddrama website. I use chrome browser. I have "Java Popular," "Adblock Plus," "Tampermonkey," and "Delicious Bookmarks Extension (Beta)" as my extensions. I think its the "Java Popular," is the reason I watch dramas on those website ad free.
I came to notice so much ad is because my chargers wire splitted, I only had it for a year and it slitted, so my macbook was going to die while I was still watching "Golden Rainbow" on gooddrama. I used my mums computer and she didn't have those extension, hence the videos ad interpreting my enjoyment of the episode.

Dragon.Fly is a blog where young lady shares her interest by mainly posting animes, dramas, mangas, music, ect. A few years have passed and she wants to extend her post to foods, recipes, remedies, random things. ^^
Showing posts with label technique. Show all posts
Showing posts with label technique. Show all posts

Oct 4, 2013
Aug 19, 2013
Trick in Cracking Hard Boiled Eggs' Shells
I learned a new trick today, while volunteering in the kitchen. I used to crack the hard boiled egg shells by knocking it on a solid surface and peel them. The cook showed me that rolling the egg with your palm while applying light pressure which was quicker in cracking the egg and loosen the shell which should be easier to peel too.
 Doing the trick on egg shells that are smooth with no crack after boiled and iced, I noticed that the majority of the egg whites also crack open with the shell. So, I first knock it once and then rolled it and then peel it.
Picture from: eateateatsleep

Picture from: eateateatsleep
Aug 11, 2013
Jul 10, 2013
Simple Egg Salad plus a nifty fast trick
 List:
List:6 hard boiled eggs, diced
1/2 cup mayo
1/2 tsp pepper (optional)
1/2 tsp salt
Mix together.
BOTTOM PHOTO FROM: thepioneerwoman.com
I learned this trick at the kitchen. It's much faster than dicing the hard boiled eggs. Also using a knife the yolk would suction onto it so that was inconvenient If you have a cooling rack with squares or anything similar you can...


Jul 3, 2013
Jun 26, 2013
How to Poach an Egg
I heard this term while in the Agrace Kitchen. I was curious what it was. I found many bloggs that they have the poach egg on bread. I don't like runny yolk, I can tolerate it in some food, but in my opinion bread and poach egg looks icky and the bread would get soggy once you break the barrier. I don't like soggy bread either.
The video is without vinegar and I thought his trick was nifty.
Other LINKS:
http://www.simplyrecipes.com/recipes/easy_poached_eggs/
The video is without vinegar and I thought his trick was nifty.
Other LINKS:
http://www.simplyrecipes.com/recipes/easy_poached_eggs/
Mar 17, 2013
Wonton Wrappings, 8 styles
LINK:
http://www.homemade-chinese-soups.com/how-to-fold-wontons.html
I like the style called Samosa with a twist style.
I like the style called Samosa with a twist style.
Feb 26, 2013
Choosing an Avocado and Cutting it
Picture and Information from: http://rasamalaysia.com/super-baby-food-avocado/
Well I didn't know how to choose which avocado it good and ready. Avocado have such a pleasing color to look at.
 To choose avocado, always look for the ones with dark green skin that is soft with no indent, which indicates the ripeness of the avocado.
How to Open an Avocado:
Cut the avocado in half, lengthwise or widthwise around the seed. Cut deep until the knife touches the seed. Twist and pull the two halves apart. To remove the seed, stick the lower end of the knife into the seed. Twist the knife and the seed will pop out.
Well I didn't know how to choose which avocado it good and ready. Avocado have such a pleasing color to look at.

How to Open an Avocado:
Cut the avocado in half, lengthwise or widthwise around the seed. Cut deep until the knife touches the seed. Twist and pull the two halves apart. To remove the seed, stick the lower end of the knife into the seed. Twist the knife and the seed will pop out.
UPDATE 3.20.13:
This website also helps avocadocentral.com, on how to pick and buy avocado. It also has interesting facts and a comparison table of the different ripening stages which I though was helpful.
Jan 9, 2013
Self Ear Piercing Experience and Prevent Infection Information
I pierced my 5th hole at home. I thought about doing it by myself, it was like a random thought that just came up during break. I wanted to have my ears pierced for awhile, when I was in China for break my parents rejected the idea.
I never thought about doing it by myself. When I was in action, it was on the whim. I just did it, I didn't do any research of the proper way but I got the gust of it. Then I went and look up for proper care, after reading the articles, they made me worry about infection for the worst because I forgot to wash my hands. The following instruction are what I did and took note from articles for future reference.
Items:
-rubbing alcohol* or ligher (to sanitize)
-wash hands with antibacterial soap or with hand sanitizer
-pin/ choose a needle similar size as earring (to poke a hole)
-non-dangling earrings that is 14k gold or stainless steel
-q-tip or cotton
-ice cube (numb pain)
*Note: If you don't have rubbing alcohol you can make sea salt solution as an alternative. sea salt to water, an 1 to 8 ratio. Don't use table salt.
How To:
First wash your hand and dry it with a clean paper towel or clean cloth. Or use hand sanitizer
Then you want to sterilize the needle and earring, get a bowl add antiseptic solution or add hot water inside and drop the poker and earring inside. Or you can like I used a lighter to disinfect the needle of germs and then wipe it clean of the residue, which I forgot to do. The needle might be hot and your using fire so be careful.
If you're afraid of pain use something cold, preferably an ice cube on the area, then sanitize the area you are piercing clean with q-tip or cotton, front and back – get your hair out of the way, if in the way.
Position your arms the way you usually put your earrings on. With the needle in the opposite hand of the would be pierced ear, eye ball the spacing you want and curvature/lining with the other holes you have and future holes. Then exert pressure. I had to use my other hand, I used more of my fingers, as a "hard surface" to exert pressure back. Then take the needle out and replace it with the earring. Disinfect.
I struggle poking the needle through but I did it. I had to take a short break of pushing the needle half way through. I didn't numb my ear lobe and it wasn't painful. When I was reflecting afterwards, I noticed that I was more nervous and jittery of getting my ears pierce with a gun at the store than my needle.
The area where the pressure was became pinkish red and inflamed for few hours. There was pain afterwards but it was easily ignored. There was also a small dot of blood but it wasn't a big deal.
Newly Pierced Ear Care:
Home Remedies for Ear Piercing Infection
HOME CARE ADVICE FOR PIERCED EAR
Pierced Ear Infection Care
Pierced Ear Infection Care 2
Use antiseptic solution for your ears – no chemicals should be used. Rubbing alcohol – isopropanol or ethanol – is commonly used, 2-3 times daily and rotate the earring 3 times 2-3 daily, like in the morning and night or also after showering.
Another tip I read somewhere that try to not have pressure on the pierced ear so don't sleep on your pierced side.
I never thought about doing it by myself. When I was in action, it was on the whim. I just did it, I didn't do any research of the proper way but I got the gust of it. Then I went and look up for proper care, after reading the articles, they made me worry about infection for the worst because I forgot to wash my hands. The following instruction are what I did and took note from articles for future reference.
Items:
-rubbing alcohol* or ligher (to sanitize)
-wash hands with antibacterial soap or with hand sanitizer
-pin/ choose a needle similar size as earring (to poke a hole)
-non-dangling earrings that is 14k gold or stainless steel
-q-tip or cotton
-ice cube (numb pain)
*Note: If you don't have rubbing alcohol you can make sea salt solution as an alternative. sea salt to water, an 1 to 8 ratio. Don't use table salt.
How To:
First wash your hand and dry it with a clean paper towel or clean cloth. Or use hand sanitizer
Then you want to sterilize the needle and earring, get a bowl add antiseptic solution or add hot water inside and drop the poker and earring inside. Or you can like I used a lighter to disinfect the needle of germs and then wipe it clean of the residue, which I forgot to do. The needle might be hot and your using fire so be careful.
If you're afraid of pain use something cold, preferably an ice cube on the area, then sanitize the area you are piercing clean with q-tip or cotton, front and back – get your hair out of the way, if in the way.
Position your arms the way you usually put your earrings on. With the needle in the opposite hand of the would be pierced ear, eye ball the spacing you want and curvature/lining with the other holes you have and future holes. Then exert pressure. I had to use my other hand, I used more of my fingers, as a "hard surface" to exert pressure back. Then take the needle out and replace it with the earring. Disinfect.
I struggle poking the needle through but I did it. I had to take a short break of pushing the needle half way through. I didn't numb my ear lobe and it wasn't painful. When I was reflecting afterwards, I noticed that I was more nervous and jittery of getting my ears pierce with a gun at the store than my needle.
The area where the pressure was became pinkish red and inflamed for few hours. There was pain afterwards but it was easily ignored. There was also a small dot of blood but it wasn't a big deal.
Newly Pierced Ear Care:
Home Remedies for Ear Piercing Infection
HOME CARE ADVICE FOR PIERCED EAR
Pierced Ear Infection Care
Pierced Ear Infection Care 2
Use antiseptic solution for your ears – no chemicals should be used. Rubbing alcohol – isopropanol or ethanol – is commonly used, 2-3 times daily and rotate the earring 3 times 2-3 daily, like in the morning and night or also after showering.
Another tip I read somewhere that try to not have pressure on the pierced ear so don't sleep on your pierced side.
Jan 7, 2013
Dec 13, 2012
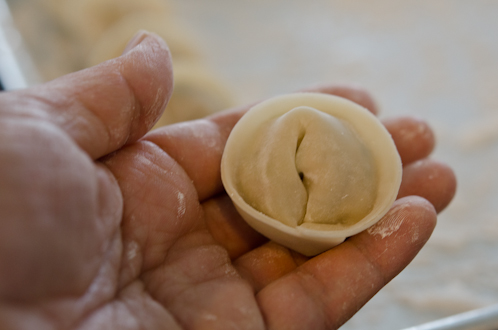
Beyond Kimchee's [photos] dumpling wrapping style
use water or egg wash as "glue."
use finger to wet the circumference and fold in half,
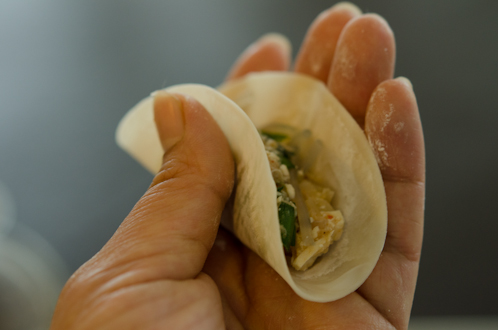
then press the ends to seal. This is what my dumpling would look like.
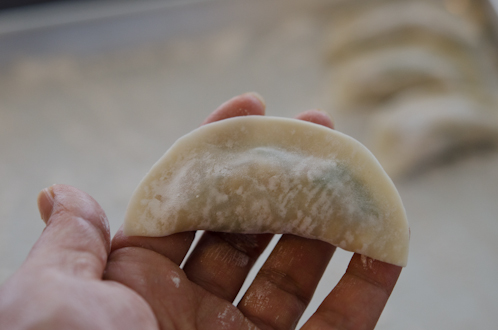 for a more creative wonton continue on...gently crease the middle, 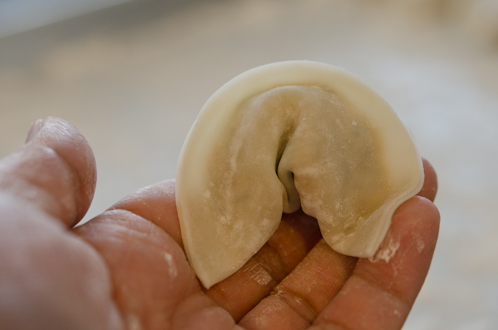 |
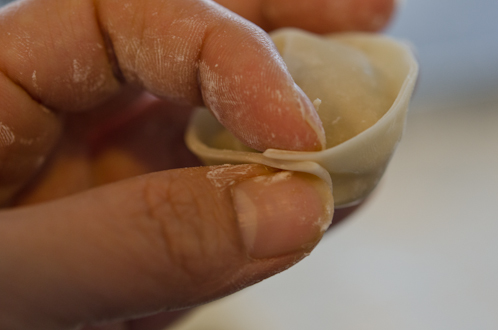
dab water on one corner and press corners together.
Dec 12, 2012
Taste Hong Kong's wonton wrapping style
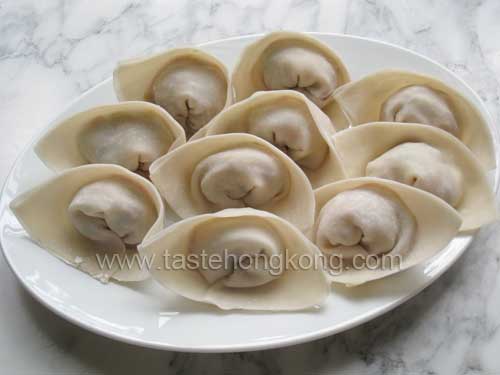
This is not how I learned to wrap wonton but this seem much simpler and easier to do.
Use water or egg wash as "glue."

Use your finger to wet the parmeter of wrapping with "glue" and fold it in half while sealing the ends. On the folded side without an opening, crease the center a bit, gently and stick/press the ends together with water.
If you're also going/plan to make dumplings or using circle wrapping here's another simple and cute wrapping style:
Dec 11, 2012
Steamed Eggs – How to Make Them Smooth From Taste Hong Kong
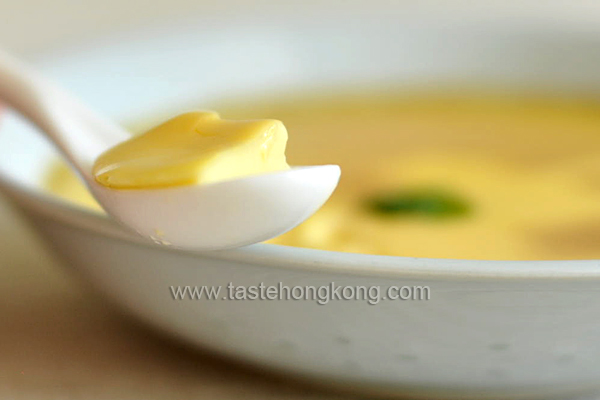 RECIPE AND PHOTO BY: Taste Hong Kong
Ingredients:
2 eggs
6 halved egg shells of boiled water
(water : egg = 1.5 : 1)
soy sauce to taste
sesame oil to taste
Method:
"Beat eggs, add cooled boiled water to egg and mix well. Strain the mixture through a sieve into a steam-proof dish. Or, you may remove the bubbles with a spoon. I’m less skillful in cleaning off the bubbles without discarding some egg juice at the same time. Therefore, using a sieve to me is more efficient.
Set up a rack with water in wok. You may need a higher rack that would suspend the dish above the water surface.
Bring the water to a boil over high heat. Place the dish with beaten eggs on a rack, then top the dish with a flat plate. Cover lid; turn to low heat and steam for 15 minutes (the egg mixture in my dish is about 1.5cm thick). Open and check if the eggs are coagulated by gently shaking the dish. Having a plate-lifter and a towel shall help move the dishes easily.
Top the steamed eggs with a dash of soy sauce and sesame oil (I haven’t included any seasonings in the egg mixture; if you have any, you may not need to add soy sauce). Serve hot.
Enjoy your variations with the additions of green onions, shrimps, scallops, meat...
In case you are new to steaming eggs, I believe a few notes below would also help.
Using halved egg shell for measurement
Doing such eliminates estimations as you don’t need to bother whether the eggs are small or large. Besides, it is also convenient. For every one egg, I measure water in its halved shell three times.
Using boiled water than tap water
I can’t offer a scientific explanation, but using cooled down boiled water helps make the egg custard smoother.
Suspending dish above water
This is to avoid having too much boiling water hitting the base of the dish, thus overheating the egg and creating some sponge-like texture inside. Perhaps in this case, I tend to become a perfectionist."
Subscribe to:
Posts (Atom)